고정 헤더 영역
상세 컨텐츠
본문
바이트 기반 스트림에 대하여 알아보겠습니다.
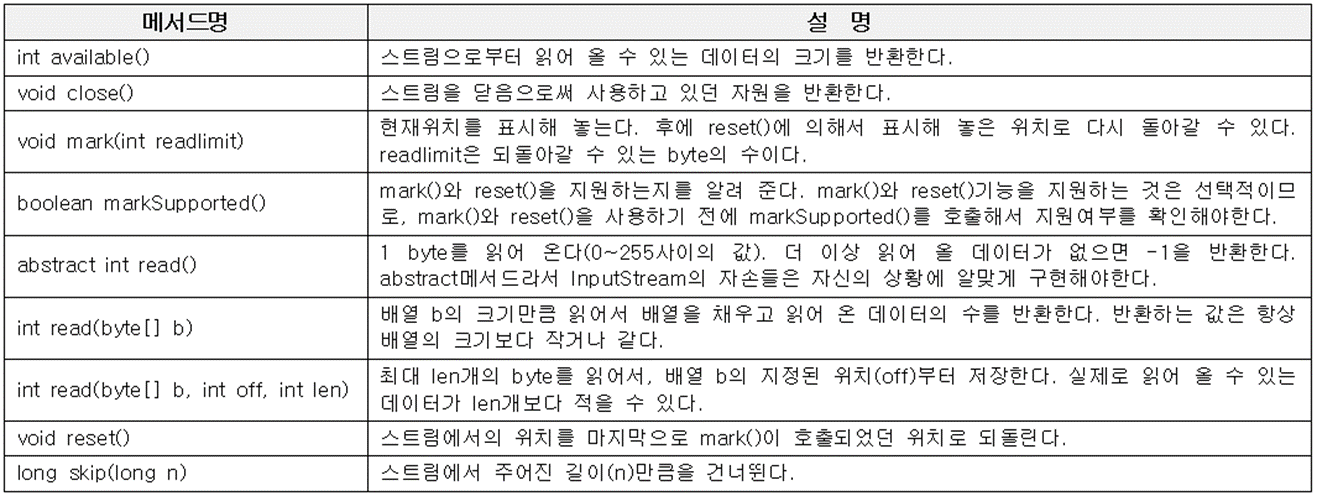
InputStream의 메서드
OutputStream의 메서드 두가지가 있으며

	byte[] inSrc = {0, 1, 2, 3, 4, 5, 6, 7, 8, 9};
		byte[] outSrc = null;

		ByteArrayInputStream input = new ByteArrayInputStream(inSrc);
		ByteArrayOutputStream output = new ByteArrayOutputStream();

		int data;	//읽어온 자료가 저장될 변수

		// read() 메서드 ==> 더 이상 읽어올 자료가 없으면 -1을 반환한다.  끝까지 왔나 비교하기 위해 -1과 비교
		while((data = input.read()) != -1 ) {	// 입력
			output.write(data); 				// 출력
		}

		// 출력된 스트림 데이터를 배열로 변환해서 저장하기
		outSrc = output.toByteArray();

		try {
			// 사용했던 스트림 닫기 ==> 사용했던 자원 반납
			input.close();
			output.close();
		} catch (IOException e) {
			// TODO Auto-generated catch block
			e.printStackTrace();
		}

		System.out.println(" inSrc => " + Arrays.toString(inSrc));
		System.out.println("outSrc => " + Arrays.toString(outSrc));
예제를 통해서 보면

입력한 만큼 출력되는 것을 알 수 있다.
배열에 저장된 내용 중에서 off 번째부터 len개 만큼 읽어오는 코드를 보겠습니다.
public class ByteArrayIOTest02 {

	public static void main(String[] args) {
		byte[] inSrc = {0, 1, 2, 3, 4, 5, 6, 7, 8, 9};
		byte[] outSrc = null;

		byte[] temp = new byte[4];

		ByteArrayInputStream input = new ByteArrayInputStream(inSrc);
		ByteArrayOutputStream output = new ByteArrayOutputStream();

		try {
			//available() 메서드 ==> 읽어올 수 있는 데이터의 개수를 반환
			while(input.available() > 0) {
//				input.read(temp);
//				output.write(temp);

				int len = input.read(temp);	//read(byte[] 배열) ==> 실제 읽어온 byte수를 반환한다.

				// temp배열의 데이터 중 0번째부터 len개수만큼 출력한다.
				output.write(temp, 0, len);


				System.out.println("반복문 안에서 temp = " +Arrays.toString(temp) );

			}
			outSrc = output.toByteArray();

			System.out.println();
			System.out.println(" inSrc = " + Arrays.toString(inSrc));
			System.out.println("outSrc = " + Arrays.toString(outSrc));

			input.close();
			output.close();

		} catch (IOException e) {
			// TODO: handle exception
		}
	}

}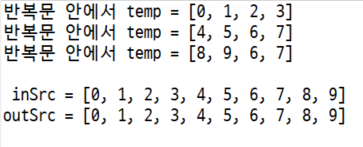
4개씩 읽어와서 마지막에는 2개만 읽어오는데 3번째 temp에서는 2개만 읽어와서 나머지 6,7은
그대로 가져온것이다.
이번에는 바이트 기반의 스트림을 이용하여 파일 내용을 읽어와 보겠습니다.
public class FileIOTest01 {

	public static void main(String[] args) {
		// 바이트 기반의 스트림을 이용하여 파일 내용 읽기
		try {
			// 읽어올 파일 정보를 인수값으로 받는 스트림객체 생성

			// 방법1
			FileInputStream fin = new FileInputStream("D:\\highjava\\D_other\\test.txt");

			// 방법2
			File file = new File("D:\\highjava\\D_other\\test.txt");
			FileInputStream fin2 = new FileInputStream(file);

			int c;	// 읽어온 데이터가 저장될 변수

			while( (c = fin.read()) != -1) { // 바이트 기반이나 문자 기반이나 사용법은 같다

				// 읽어온 문자를 화면에 출력하기
				System.out.print((char)c);
			}
			fin.close(); 	// 스트림 닫기


		} catch (IOException e) {
			System.out.println(" 오 류 오 류 오 류 오 류 오 류 오 류 오 류 오 류 오 류 오 류 오 류");
		}

	}

}
결과를 보면
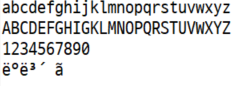
아직 한글은 따로 처리를 안해서 한글은 안나온다...
이번엔 FileOutputStream을 이용하여 텍스트 파일을 만들어 보겠습니다.
public class FileIOTest02 {

	public static void main(String[] args) {
		try {
			FileOutputStream fout = new FileOutputStream("D:\\highjava\\D_other\\fileout.txt");

			for(char ch = 'A'; ch <= 'Z'; ch++) {
				fout.write(ch);	// ch변수의 데이터를 파일로 출력한다.

			}
			System.out.println("출력완료...");
			fout.close();

		} catch (IOException e) {
			// TODO: handle exception
		}

	}

}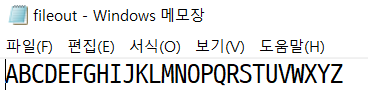
해당 폴더에 들어가면 텍스트파일로 만들어져 있는 것을 볼 수 있다.
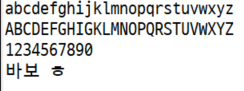
이번에는 아까 안나왔던 한글을 나오게 해보겠습니다.
public class FileIOTest03 {

	public static void main(String[] args) {
		// 문자 기반의 스트림을 이용하여 파일 내용 읽기

		try { // Reader로 끝나면 입력 Writer로 끝나면 출력
			// 문자 기반의 파일 입력용 스트림 객체 생성
			FileReader fr = new FileReader("D:\\highjava\\D_other\\test.txt");

			int c;

			while( (c = fr.read()) != -1 ) {
				System.out.print((char)c);
			}

		} catch (IOException e) {
			// TODO: handle exception
		}

	}

}